Think Pink...October is Breast Cancer Awareness Month so I decorated some pink cookies at the bakery. Many of us know and care about somebody who has been diagnosed with breast cancer. May these cookies bring some hope and love to the locals who will get to see and taste them. And hopefully some smiles from those far away who only get to see my photos. :)
Showing posts with label Desserts. Show all posts
Saturday, October 11, 2014
Saturday, July 19, 2014
Black Raspberry Picking and a Yummy Crisp
The kids and I went black raspberry picking at a local farm this week. We are all about u-pick farms and try to do as many as we can each year including black raspberries, red raspberries, blueberries, strawberries, and apples. I think I had the most fun on this trip as the kids quickly got tired of being poked and scratched by all the thorny bushes but I would still call the day a big success. We got lots of black raspberries. Enough to snack on, freeze some, and make a yummy crisp for dessert!
Fruit Portion:
6 medium to small size peaches (or 4 large ones)
1/2 pint black raspberries
2 T. corn starch
1/3 c. sugar
1/4 t. cinnamon
Crisp Topping:
1/2 c. room temperature butter
1/2 c. flour
1 c. light brown sugar
1 c. old fashioned oats
1/4 t. cinnamon
Method:
Preheat your oven to 350 degrees. Peel and slice peaches. Mix corn starch, sugar, and cinnamon. Toss sugar mixture with peaches and black raspberries. Put fruit mixture into 9×9 pan.
In a mixing bowl, mix thoroughly (with two hands) the butter, flour, brown sugar, oats, and cinnamon together. Cover peaches and black raspberries with oat topping by crumbing the topping over the fruit.
Bake for about 35 minutes or until the crisp topping is a golden brown and the fruit juices are bubbling. Enjoy alone or add some vanilla ice cream!
As always, I now turn to Pinterest when I am in need of a certain kind of recipe. I found this great recipe for a peach (which we also had laying around) and black raspberry crisp. It was super easy to throw together and made the house smell so good.
After dinner tonight, we topped it with some vanilla ice cream and it was de-lish!!!! I just love all the fresh fruits and veggies that come with summer time!
Peach and Black Raspberry Crisp
Source: Inaccurate and Unreliable
6 medium to small size peaches (or 4 large ones)
1/2 pint black raspberries
2 T. corn starch
1/3 c. sugar
1/4 t. cinnamon
Crisp Topping:
1/2 c. room temperature butter
1/2 c. flour
1 c. light brown sugar
1 c. old fashioned oats
1/4 t. cinnamon
Method:
Preheat your oven to 350 degrees. Peel and slice peaches. Mix corn starch, sugar, and cinnamon. Toss sugar mixture with peaches and black raspberries. Put fruit mixture into 9×9 pan.
In a mixing bowl, mix thoroughly (with two hands) the butter, flour, brown sugar, oats, and cinnamon together. Cover peaches and black raspberries with oat topping by crumbing the topping over the fruit.
Bake for about 35 minutes or until the crisp topping is a golden brown and the fruit juices are bubbling. Enjoy alone or add some vanilla ice cream!
Sunday, March 16, 2014
Sunday, March 9, 2014
Guilt Free Chocolate "Ice Cream"
My kids love eating ice cream after dinner. They don't have it too often around here as we try to keep it as a special treat. While we were eating dinner, I told the kids we were going to have some "healthy ice cream" tonight and they were so excited and all for it!
We've made "ice cream" before out of frozen bananas but this recipe has a little different twist. Adding in some almond butter and cocoa powder for a chocolate version.
The kids were anxious to help create this concoction and their bowls were completely empty within minutes!
Kid tested...mom approved!!!
Source: www.isavea2z.com
4 or 5 frozen bananas
1 T. almond butter
1 T. unsweetened cocoa powder
1 T. (or more) coconut milk
Cut up bananas and freeze them overnight or longer. Put the frozen bananas into your food processor and mix until you see finely shredded banana pieces. Add almond butter, cocoa powder, and 1 T. coconut milk. Add in more coconut milk until it's the consistency you want. Serve immediately.
Sunday, February 9, 2014
Paleo Chocolate Chip Cookies
For the last week and a half, I'm proud to say that I've cut out 90% or more of processed foods from my diet. I've noticed great results not only on the scale, but more importantly in my energy level! I've been eating lots of proteins, veggies, fruits, raw nuts, etc. and it's amazing how full I feel throughout the day now. For instance, instead of sugary cereal, I've been eating eggs with spinach for breakfast. If I get hungry after lunch, I'll snack on some nuts or fruits/veggies and it easily gets me through until dinner time. I've been baking a lot with almond flour and coconut flour as well as making yummy smoothies with organic frozen fruit, bananas, a little honey, and almond milk.
Every now and then I will have a craving for something sweet and that's when I'll grab one of these. I've experimented with several Paleo chocolate chip cookie recipes and this is by far my favorite! They taste great right out of the oven and also freeze well. I'll make a batch, eat one, and put the rest in an air-tight container in the freezer so I can grab one here and there throughout the week.
My daughter will usually help me make these cookies and I had to laugh the first time we made them. I told her we were making "Healthy Cookies". When I went to pull them out of the oven she said, "Those don't look like cookies!!!!" So don't let the looks of them fool you. They taste great AND are good for you!
Paleo Chocolate Chip Cookies
3 T. Coconut Oil, melted
2 T. Honey
2 t. pure vanilla extract
1 T. unsweetened almond milk
1 c. blanched almond flour
1 1/2 T. coconut flour
1/4 t. Celtic sea salt
1/4 t. baking soda
1/4 c. high quality chocolate chips (I've been using 1/2 dark chocolate and 1/2 carob chips to make them even healthier)
Preheat oven to 350.
Beat wet ingredients in one bowl. Mix dry ingredients in another bowl. Mix dry with wet and fold in chocolate.
Line cookie sheet with parchment and scoop rounds tablespoons onto cookie sheet.
Bake 9-10 minutes. Cool and store in air-tight container or freeze. Makes 10 cookies.
Sunday, January 5, 2014
Grape {Dessert} Salad
We got back last night from visiting my family in Indiana. Just in time before the big snow hit! It's been snowing...and snowing...and SNOWING today! School is already canceled for tomorrow and the kids and I had a blast sledding today in all this fresh white snow before the temperature drops tonight/tomorrow.
We had a great time in Indiana and got to celebrate Christmas with my side of the family. The kids loved the extra time with their grandma, grandpa, and cousins! For our family get-together I wanted to try this grape salad recipe that my uncle emailed me a few weeks back. It was a huge hit and super delicious. It's super sweet so it's more like a dessert than a salad. The crunchiness of the pecans and toffee were the perfect combination with the grapes. I halved the recipe when I made it and there were no leftovers by the time we were all done. Thanks for sharing the recipe, Tim! It was a big hit!
Source: Tim H.
2 lbs. red grapes
2 lbs. green grapes
Mix together:
8 oz. cream cheese, room temperature
8 oz. sour cream
1/2 c. powdered sugar
1 1/2 tsp. vanilla
Fold in grapes and chill.
Just before serving add:
1/2 c. brown sugar
1/2 c. chopped pecans
8 oz. package of Heath Toffee Chips
Mix and serve.
Wednesday, January 1, 2014
"Fried" Chicken Leg Cookies
I try to do something fun and unique for my hubby's birthday each year. Two years ago I made him this cream puff "cake". Last year I made him a Llama cake. This year I wanted to make something fun that didn't involve traditional cake. I also wanted to incorporate his favorite food...Popeye's Chicken! I found an idea on Pinterest and ran with it. Sugar cookies in the shape of chicken legs!
It's impossible to find a cookie cutter in the shape of a chicken leg so each cookie was cut out by hand using a stencil I made out of card stock. The funniest part of this project was making a trip to Popeye's and asking for two empty boxes and a plastic bag. I asked the manager if I could buy them from her and she looked at me with a funny face and said, "Um, you can just have them." I then explained what I was doing and they were excited to help out with the boxes.
These are just standard sugar cookies with royal icing on them. Brush on a mixture of meringue powder and water, and then pat some crumbled Corn Flakes on top to give them a fried chicken texture. For complete details and instructions, visit Bridget's blog over at Bake at 350. She makes the most amazing sugar cookies and I just love following her blog. This was her idea and she used a KFC bucket to put her cookies in.
Here's my cute hubby in his ugly Christmas sweater after opening up his Popeye's "chicken". I delivered two boxes full of cookies to his work so everyone could share in on the fun.
Happy Birthday Babe! Not sure what I'll come up with next year...but I'm sure it will be good! :)
Thursday, November 21, 2013
St. Louis Gooey Butter Cake...and ALASKA
This fall we ventured to Alaska for a vacation with my husband's side of the family. It was AMAZING....absolutely breath-taking! If you've never been, I highly recommend that you add it to your bucket list. It was our first time packing long johns and winter coats for a vacation instead of the usual shorts and bathing suits; however it is one of our favorite vacations so far. We went kayaking, on a helicopter ride, walked on top of a glacier, rode a boat to fetch live crabs, and I even won the black jack tournament on our cruise ship. What great memories were made!
On the cruise ship, we met a nice couple from St. Louis. Their room was right next to ours and {unsurprisingly} we started talking about food one day. :) After asking if we'd ever had St. Louis Gooey Butter Cake she promised to email it after our cruise. I had never had it but just hearing about it made my mouth begin to drool.
So here you have it, the St. Louis Gooey Butter Cake. It is LOADED with sugar and definitely holds true to its name. It's gooey and rich and tasted like a little piece of heaven. Thank you so much for sharing this recipe with me, Leslie!
St. Louis Gooey Butter Cake
Crust:
1 Yellow Cake Mix
1 Egg
1 Stick Melted Butter
Mix above ingredients together and press into a 13" x 9" pan, press around edges to make a rim.
Filling:
1 8 oz. Package of Cream Cheese
1 (1 lb.) box Powdered Sugar (4 cups)
1 teaspoon Vanilla
Mix above ingredients until smooth. Pour over cake mix.
Bake 40 minutes at 350 degrees. Sprinkle with powdered sugar when cool. Cut into small squares.
Note: Cake will look Gooey even when done so, watch the time and crust for indication that it is done. I only ended up baking mine for about 20 minutes when it started browning.
Thursday, October 24, 2013
Witches Broom Cookies
Eek! Only SEVEN more days until Halloween!!! The final pieces to the kids' Halloween costumes came in the mail and I am getting so excited!
For dessert last night we had Witches Broom Cookies. What a fun way to show our Halloween spirit. To make it even easier we used Gluten Free Peanut Butter Cookie Dough from our friends at Immaculate Baking. So these were a cinch to put together.
In a few more days we'll be carving our pumpkins and ready to go Trick-or-Treating.
For dessert last night we had Witches Broom Cookies. What a fun way to show our Halloween spirit. To make it even easier we used Gluten Free Peanut Butter Cookie Dough from our friends at Immaculate Baking. So these were a cinch to put together.
In a few more days we'll be carving our pumpkins and ready to go Trick-or-Treating.
Witches Broom Cookies
12 Pretzel Rods
2/3 c. chocolate chips
2/3 c. white chocolate chips
1 t. shortening, divided
Preheat oven to 325 degrees. Place the pretzel rods on two separate ungreased cookie sheets. Take ball of cookie dough and form it into a broom shape then press onto the end of each pretzel rod. Gently press with your palm to slightly flatten. Further press with a fork to create bristles on the broom. Bake 15 minutes or until set but not brown. Cool completely.
Make a chocolate drizzle by melting 2/3 cup chocolate chips and 1/2 t. shortening in a microwavable safe bowl. Microwave on medium-high for 30 seconds. Stir. Microwave for 10 seconds intervals, stirring in between, until the chocolate is melted. Once the cookies have cooled completely, spoon the melted chocolate over the brooms.
Optional: Create a white chocolate drizzle (the same way you made the milk chocolate drizzle) and drizzle over the milk chocolate. You can decorate these brooms however you like. For some I drizzled some white chocolate over the milk chocolate. For others, I highlighted the broom's bristles with the white chocolate.
Allow the chocolate to harden on the cookies before packaging them up.
* Please note that Immaculate Baking did provide me with coupons and free product; however all opinions are 100% mine. :)
Thursday, September 5, 2013
Mini Fruit Pizzas
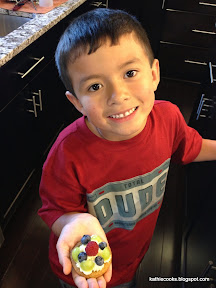
What a crazy busy week this has been! Most importantly it is the first week of school here in Michigan. My first grader has LOVED every minute of it so far! He quickly found his way around his new school and has made several new friends already. To make the first week of school special, I wanted to make a new after-school treat for C. With the help of Immaculate Baking, it was super simple and didn't take much time at all!
Have any of you heard of Immaculate Baking? Immaculate Baking is best known for their delicious refrigerated baking dough; colorful American folk art packaging. With a fun variety of products, Immaculate Baking offers goodies made with high-quality organic and natural ingredients: Ready-to-Bake cookie (including gluten-free!), biscuit, scone, cinnamon roll, and crescent roll doughs.
I got the inspiration for this after-school snack from my previous recipe called Fruit Pizza. Same idea, only this time in smaller, individual sized portions.
MINI FRUIT PIZZAS
1 pkg. Immaculate Baking Vanilla Sugar Cookie Dough (24 Cookies), baked according to directions on package
Mix Together: 4 oz. cream cheese and 1/2 c. powdered sugar
Spread cream cheese mixture onto cookies.
Dice up raspberries, strawberries, grapes, and blueberries (or fruit of your choice) and decorate cookies as desired.
C even got a hit out of helping me in the kitchen. Check out his cool creation! Yum!!!

* Please note that Immaculate Baking did provide me with coupons and free product; however all opinions are 100% mine. :)
Have any of you heard of Immaculate Baking? Immaculate Baking is best known for their delicious refrigerated baking dough; colorful American folk art packaging. With a fun variety of products, Immaculate Baking offers goodies made with high-quality organic and natural ingredients: Ready-to-Bake cookie (including gluten-free!), biscuit, scone, cinnamon roll, and crescent roll doughs.
I got the inspiration for this after-school snack from my previous recipe called Fruit Pizza. Same idea, only this time in smaller, individual sized portions.
- - - - - - - - - - - - - - - - - - - - - - - -
1 pkg. Immaculate Baking Vanilla Sugar Cookie Dough (24 Cookies), baked according to directions on package
Mix Together: 4 oz. cream cheese and 1/2 c. powdered sugar
Spread cream cheese mixture onto cookies.
Dice up raspberries, strawberries, grapes, and blueberries (or fruit of your choice) and decorate cookies as desired.
- - - - - - - - - - - - - - - - - - - - - - - -
C even got a hit out of helping me in the kitchen. Check out his cool creation! Yum!!!
* Please note that Immaculate Baking did provide me with coupons and free product; however all opinions are 100% mine. :)
Sunday, July 28, 2013
Cronuts
Cronuts are in the shape of a donut and are fried just as a donut is; however, they have lots of layers (and butter) like a croissant does. There are many, many copy cat recipes on the internet and with some help from my bakery friends, we tried one out last week.
They are very time consuming as you have to roll out the dough and fold it several times, refrigerating it 30-45 minutes between each fold, in order to get all those delicious layers. They were pretty amazing however. Will I be making them again? Probably not. We made a double batch of the recipe which made about 22 donuts. There were 4 STICKS OF BUTTER in those 22 donuts. Now, I won't tell you how many I ate, but I will tell you I was a little disturbed thinking about all that butter! LOL!
Were they kid approved? Absolutely!!! Everyone loved them!
Even the donut holes were amazing!
We ended up covering some in powdered sugar and some in a cinnamon sugar mixture as well. The cinnamon sugar cronuts were voted #1 among all of us!
So if you are brave enough to digest as much butter as I did. (It really is worth it! :) Then here's the recipe for you...
Source: Food52
Makes 1 dozen
Dough:
3/4 cups milk, warmed
1 tablespoon active dry yeast
1/3 cup sugar
2 large eggs
1 teaspoon vanilla
3 1/2 cups all-purpose flour (divided)
1 teaspoon salt
1 cup butter, at room temperature
Maple Glaze:
1/2 cup powdered sugar
3 tablespoons pure maple syrup
1 to 2 tablespoons milk, cream or water
Saturday, January 19, 2013
Orange Poke Cake
I first had this cake over the holidays while visiting with my family. It disappeared quickly and I was sad that I didn't get a picture of it before it was all eaten up! My hubby reassured me not to worry because we'd have to make it again as soon as we got back home. It was just that good!!!

Orange Poke Cake
Source: Susan M.
1 box of Orange Cake Mix (prepared according to directions on box)
1 T. Water
1/3 c. Orange Juice (I used Sunny Delight)
2 c. Powdered Sugar
Bake the orange cake following the directions on the box. Then mix water, orange juice, and powdered suger.
When cake comes out hot, poke holes with fork, then pour mixture over the top. Allow the cake to cool completely and absorb all the liquid...then enjoy with some whipped cream and orange zest...it's even good all by itself!!

Orange Poke Cake
Source: Susan M.
1 box of Orange Cake Mix (prepared according to directions on box)
1 T. Water
1/3 c. Orange Juice (I used Sunny Delight)
2 c. Powdered Sugar
Bake the orange cake following the directions on the box. Then mix water, orange juice, and powdered suger.
When cake comes out hot, poke holes with fork, then pour mixture over the top. Allow the cake to cool completely and absorb all the liquid...then enjoy with some whipped cream and orange zest...it's even good all by itself!!
Thursday, January 10, 2013
Mini Banana Cream Pies
Now it's time to talk about some of the desserts I served at hubby's surprise party. These mini banana cream pies were one of my favorites! Served in little plastic shot-glass type cups and eaten with mini spoons, they were a delight to eat.
Mini Banana Cream Pies
Source: Bloom
Whipped Cream:
2 c. heavy whipping cream
1 c. powdered sugar
1 t. vanilla
Add all the ingredients to a stand mixer attached with your whip and slowly start to mix. Once all the powdered sugar is incorporated, turn to high and whip away. Don't walk away- it will separate into curds if you let it go to long. Put the whipped cream into a piping bag and it will save for a good 24 hours.
Banana Cream Pies:
Instant banana pudding
Whole milk
Caramel sauce
Whipped cream (recipe above)
Mini sized vanilla wafers
Bananas
Prepare pudding as directed on package for pie, not pudding. I use slight less milk so that my pudding is thicker. Put pudding into a piping bag. Any tip will work. This is just to make it easier and quicker to get it into the cups.
Put just a little dollop of pudding into the cups to seal the cookie on the bottom. Put on mini cookie over it and press down. Put another dollop of pudding on top of the cookie. Add a banana slice (approx. 1/4 inch thick) and again push down. You don't want huge spaces of pudding. Fill any space around the banana with pudding and cover the top of the banana with with another small dollop. Add another vanilla wafer and push down. Add a thin zigzag of caramel (the secret ingredient). Just a little! Too much will take away from the pie but just a little really make this dessert stand out! Repeat the banana step but then fill to the top of your cup with pudding. Make sure to cover the banana so it doesn't brown. Seal the entire dessert with your whipped cream and top with a mini wafer.
Mini Banana Cream Pies
Source: Bloom
Whipped Cream:
2 c. heavy whipping cream
1 c. powdered sugar
1 t. vanilla
Add all the ingredients to a stand mixer attached with your whip and slowly start to mix. Once all the powdered sugar is incorporated, turn to high and whip away. Don't walk away- it will separate into curds if you let it go to long. Put the whipped cream into a piping bag and it will save for a good 24 hours.
- - - - - - - - - - - - - - - - - - - - - - - - - - - - - - - - - - - -
Banana Cream Pies:
Instant banana pudding
Whole milk
Caramel sauce
Whipped cream (recipe above)
Mini sized vanilla wafers
Bananas
Prepare pudding as directed on package for pie, not pudding. I use slight less milk so that my pudding is thicker. Put pudding into a piping bag. Any tip will work. This is just to make it easier and quicker to get it into the cups.
Put just a little dollop of pudding into the cups to seal the cookie on the bottom. Put on mini cookie over it and press down. Put another dollop of pudding on top of the cookie. Add a banana slice (approx. 1/4 inch thick) and again push down. You don't want huge spaces of pudding. Fill any space around the banana with pudding and cover the top of the banana with with another small dollop. Add another vanilla wafer and push down. Add a thin zigzag of caramel (the secret ingredient). Just a little! Too much will take away from the pie but just a little really make this dessert stand out! Repeat the banana step but then fill to the top of your cup with pudding. Make sure to cover the banana so it doesn't brown. Seal the entire dessert with your whipped cream and top with a mini wafer.
Tuesday, November 13, 2012
Pay Day Bars
It's crazy that November is half way over already and Thanksgiving is next week!!! Where does the time go?
My sister made these yummy Pay Day bars a couple weeks ago but I held off on posting the recipe because I figured everyone was on candy overload from Halloween. Hopefully everyone's candy stash is depleted because you'll want to give this one a try!
Pay Day Bars
Source: S. Miller
16 oz. jar salted, dry roasted peanuts
3 T. butter
1 bag peanut butter chips
1 can sweetened condensed milk
2 c. miniature marshmallows
Spray a 9x13 pan with non-stick spray. Pour 1/2 of the peanuts on the bottom of the pan. Melt butter, peanut butter chips and sweetened condensed milk. Remove from heat and fold in the marshmallows. Pour over the peanuts. Put the rest of the peanuts on top and pat down lightly. Chill and cut into bars.
My sister made these yummy Pay Day bars a couple weeks ago but I held off on posting the recipe because I figured everyone was on candy overload from Halloween. Hopefully everyone's candy stash is depleted because you'll want to give this one a try!
Pay Day Bars
Source: S. Miller
16 oz. jar salted, dry roasted peanuts
3 T. butter
1 bag peanut butter chips
1 can sweetened condensed milk
2 c. miniature marshmallows
Spray a 9x13 pan with non-stick spray. Pour 1/2 of the peanuts on the bottom of the pan. Melt butter, peanut butter chips and sweetened condensed milk. Remove from heat and fold in the marshmallows. Pour over the peanuts. Put the rest of the peanuts on top and pat down lightly. Chill and cut into bars.
Sunday, September 16, 2012
Frozen Peanut Butter Turtle Pie
I always try to make a yummy dessert when having out of town visiters. This time I needed something to make ahead of time so I tried this recipe from Kraft. Can't go wrong with a frozen peanut butter pie! It was pretty amazing and I even made my own caramel sauce for it instead of buying the pre-made caramel ice cream topping from the grocery store. I've been nibbling on the leftovers all week and sadly, it's all gone. I need some more guests so I'll have another excuse to make some dessert! :)

Frozen Peanut Butter Turtle Pie
Source: Kraftfoods.com
1 tub (8 oz.) Philadelphia Cream Cheese Spread
1/3 c. creamy peanut butter
1/2 c. sugar
2 c. thawed Cool Whip
1/4 c. caramel ice cream topping
1 Oreo Pie Crust
1/4 c. coarsely chopped Planters Pecans, toasted
2 squares, Baker's Semi-Sweet Chocolate
Beat cream cheese spread, peanut butter, and sugar in large bowl with mixer until well blended. Add Cool Whip; mix well.
Spread caramel topping onto bottom of crust; cover with cream cheese mixture. Freeze 4 hours.
Top with nuts just before serving. Melt chocolate as directed on package; drizzle over pie.
Frozen Peanut Butter Turtle Pie
Source: Kraftfoods.com
1 tub (8 oz.) Philadelphia Cream Cheese Spread
1/3 c. creamy peanut butter
1/2 c. sugar
2 c. thawed Cool Whip
1/4 c. caramel ice cream topping
1 Oreo Pie Crust
1/4 c. coarsely chopped Planters Pecans, toasted
2 squares, Baker's Semi-Sweet Chocolate
Beat cream cheese spread, peanut butter, and sugar in large bowl with mixer until well blended. Add Cool Whip; mix well.
Spread caramel topping onto bottom of crust; cover with cream cheese mixture. Freeze 4 hours.
Top with nuts just before serving. Melt chocolate as directed on package; drizzle over pie.
Thursday, July 26, 2012
John Deere Tractors

I grew up on a farm in Indiana so I know good and well what a John Deere tractor looks like! :) I had a blast making these cookies for a cute little boy about to turn 2 years old. This little man lives in Iowa so this was my first "long-distance" order. I was a little hesitant to do it but I figured, why not give it a try? I'm glad I took some before pictures because unfortunately none of them made it there in one piece. :( Apparently Iowa is too far away from Michigan to ship cookies no matter how much bubble wrap and "FRAGILE" stickers you put on the box! Oh well, lesson learned and hopefully they were still able to eat some of them! Happy birthday P!

On a side note, there are many people on Etsy that sell decorated sugar cookies and will ship to anywhere in the U.S. If I have any readers that do this, can you offer up some advice? What did I do wrong? What can I do differently if there is ever a next time? Thanks so much!
Thursday, June 28, 2012
Piece Montee or Croquembouche
My hubby and I celebrated our 8th wedding anniversary this week. While I was at my son's t-ball game, he surprised me by cooking an amazing meal while we were at the field. It was one of the best meals ever! Spinach salad, bacon-wrapped filet, baby asparagus tips, and baby bella mushrooms sauted with butter, garlic, salt, and pepper. Not to forget the bottle of wine and cannolis we had for dessert! I had every intention of making him an extravagant dessert but by the time I got off work, ran errands, and went to t-ball, it just didn't happen. So I promised him I had something up my sleeve and made this the following day.
Many of you are probably wondering what Croqeumbouche even means! "A croqembouche is a French cake, a kind of piece montee often served at weddings, baptisms, and first communions. It is typically a high cone of profiteroles (pate choux filled with pastry cream) and usually decorated with threads of caramel. The name come from the French words croque en bouche meaning 'crunch (or munch) in (the) mouth'. It brought back many memories of culinary school and made me remember just how much fun it is playing with caramelized sugar. The caramelized sugar acted as glue so that I could make my masterpiece as tall as I wanted. Then I swirled some caramelized sugar around the entire piece as well as made some sugar spirals. Sugar can be a lot of fun to play with but you must use extreme caution as you could burn yourself very easily.
So here it is...my first Croquembouche.
Happy Anniversary Honey!!!
Thursday, May 31, 2012
Another Kit Kat and M&M Cake
Remember my red, pink, and white Kit Kat / M&M cake last February? Click here to see the post. Well...I am still in love with these cakes and have made several more since then. Just recently I had a request for one with blue, teal, and green M&M's.
What a unique and fun way to surprise someone on their birthday!
Wednesday, May 2, 2012
Grape Cow
Well, I've heard of a root beer float, a black cow (ice cream float with Coke), and even an orange cow (ice cream float with orange soda) but I've never heard of a Grape Cow before!!! Last summer my uncle was telling me how good it is to blend together grape juice (the purple kind) and ice cream in a blender to make a grape milkshake. Sounded kind of weird to me so we tried it last weekend while my sister and brother-in-law were in town. The verdict? Pretty darn good! The first attempt I put a little too much grape juice in and it just tasted like a creamy grape juice. The second attempt was perfect with more of a milkshake consistency. My 5 year old keeps asking if I'll make more.
Purple grape juice
Vanilla ice cream
Blend together in blender, add straw, and ENJOY!
Purple grape juice
Vanilla ice cream
Blend together in blender, add straw, and ENJOY!
Sunday, April 29, 2012
Dog Birthday Cake
My baby turned TWO this week! We celebrated by having a BBQ and small party with family. K just adores dogs of all shapes and sizes. We don't have any pets at our house but every time we drive past a dog or see one going on a walk she will yell with excitement. I thought is was only appropriate to make her birthday cake in the shape of a doggie this year. It was made with 1/2 chocolate cake and 1/2 banana cake with chocolate buttercream icing. My inspiration came from this tutorial on Cake Central. I was very pleased with how it turned out and K liked it even more! It was the perfect cake for her second birthday.
Subscribe to:
Posts (Atom)