Showing posts with label Snacks. Show all posts

Wednesday, January 29, 2014

Kolaches

Have you ever eaten at The Kolache Factory?  We used to be a frequent visitor when we lived in Indiana.   I haven't had one in years but ran across this recipe a few days ago.  It instantly brought back wonderful memories of these little buns filled with random goodness! While I won't say they are exactly the same as the real thing, they were still pretty amazing and addictive as well.  At the end of the meal it was hard to remember how many of these I devoured. 

They are a bit time consuming to make but I had a lot of fun with it. It was the perfect thing to make during our day of subzero temperatures. The filling combinations are endless. You can pretty much stuff them with whatever you like.  Here are the combos I made:

1. Pepperoni and Mozzarella Cheese 
2. Hotdogs (cut in half)
3. Sausage and Cheddar Cheese
4. Scrambled Eggs, Sweet Peppers, and Sausage
5. BBQ Chicken


The pepperoni ones turned out to be my favorite. I sprinkled some oregano on top right before baking them. They are pretty amazing if you serve them with a side of pizza sauce!


Some of them came out with too much bread and not enough filling.  At the time, I felt like I was putting a ton of filling inside; however once the bread was done rising and baking, the bread to filling ratio was off.  So make sure you roll the dough balls out thin and put LOTS of filling inside.

Here's a prime example of how my BBQ chicken and Egg kolaches had too much bread and not enough filling.  They were still good...just a lesson learned for next time!


What a great experiment. I always love trying new recipes! This recipe came from Homemade Mamas. If you do decide to make this recipe, check out her website for some great step by step pictures.


Kolaches
Source: Homemade Mamas

1 package of active dry yeast
1 c. warm milk
1/2 c. sugar
4 c.all-purpose flour 
2 eggs for dough
1/2 c. melted butter
1 t. of salt
1 egg for egg wash

This will make about 24 kolaches. I doubled the recipe so we'd have enough to eat for a couple days.

1. In a large bowl, combine yeast, warm milk (105-110 degrees), sugar and one cup of flour. Cover and let it rise until doubled in size.

2. In a small bowl beat the 2 eggs, slowly add the 1/2 cup of melted butter and salt.

3. Add egg mixture to yeast mixture and mix.

4. Mix in the flour, 1/2 cup at a time. It is a really soft, sticky dough.

5. Knead dough for about 10 minutes on a well floured surface. (I used my kitchen aid mixer.) Place dough in a well greased bowl. Cover with plastic wrap and let rise until doubled in size - about an hour.

6. While the dough is rising, get your fillings ready.

7. After dough has risen, punch it down and pull off egg-sized pieces. In your hands, roll pieces into balls and then flatten to about 4 inches in diameter. 

8. Spoon about 1 1/2 or 2 Tbls of filling.

9. Close dough around filling. Pinch it shut and place seam side down on greased cookie sheet. Cover with plastic wrap and let rise 20 min. Preheat oven 375 degrees.

10. Beat the third egg. Before you bake the kolaches, brush with egg. If you are making a couple different flavors, you may want to mark them. For example, I sprinkled oregano on the pepperoni ones. 

11.Bake in oven at 375 degrees for 12 to 15 minutes. They will be lightly golden brown when they are done.

Sunday, October 20, 2013

Homemade Salsa


Summer is definitely over. The temps are getting chilly around here and I picked up my last farm share (CSA = community supported agriculture) on Thursday.  It included green onions, radishes, turnips, spinach, butternut squash, carrots, sweet potatoes, cilantro, and my last fresh picked tomatoes of the year. Bummer!

I love supporting local farmers and I have been 100% pleased with my farm share from Hand Sewn Farms based out of Manchester, MI.  Megan was such a pleasure to work with.


Knowing these were my last fresh tomatoes of the season, I knew there was one thing I really wanted to make...SALSA!!!  I already had onions and cilantro so I was well on my way!

I could just sit and eat a whole bowl of salsa.  Yum!  This batch had a few too many onions for my liking so I scaled it down in the recipe for next time. This was my last taste of summer. It's time to move on to soups and lots of pumpkin recipes. 


Easy Homemade Salsa
Source: A Busy Girl

6 medium tomatoes
1/4 large sweet onion
3 big cloves of raw garlic
1 medium-sized JalapeƱo pepper, seeded
1/2 c. fresh cilantro (measured before chopping)
Freshly squeezed lime juice – 1/2 to 3/4 of a medium lime
Salt and pepper to taste
Dice all the ingredients and put them into in a bowl. Give it a good stir. Taste test and make adjustments as necessary. Store in refrigerator in an air tight container.
It gets even better after it sits in the fridge for a couple of days, as the flavors meld together.

Thursday, September 5, 2013

Mini Fruit Pizzas

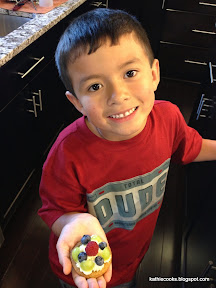
What a crazy busy week this has been! Most importantly it is the first week of school here in Michigan.  My first grader has LOVED every minute of it so far! He quickly found his way around his new school and has made several new friends already.  To make the first week of school special, I wanted to make a new after-school treat for C. With the help of Immaculate Baking, it was super simple and didn't take much time at all!

Have any of you heard of Immaculate Baking? Immaculate Baking is best known for their delicious refrigerated baking dough; colorful American folk art packaging. With a fun variety of products, Immaculate Baking offers goodies made with high-quality organic and natural ingredients: Ready-to-Bake cookie (including gluten-free!), biscuit, scone, cinnamon roll, and crescent roll doughs.

I got the inspiration for this after-school snack from my previous recipe called Fruit Pizza.  Same idea, only this time in smaller, individual sized portions.


-  -  -  -  -  -  -  -  -  -  -  -  -  -  -  -  -  -  -  -  -  -  -  -

MINI FRUIT PIZZAS

1 pkg. Immaculate Baking Vanilla Sugar Cookie Dough (24 Cookies), baked according to directions on package


Mix Together: 4 oz. cream cheese and 1/2 c. powdered sugar


Spread cream cheese mixture onto cookies.


Dice up raspberries, strawberries, grapes, and blueberries (or fruit of your choice) and decorate cookies as desired.


-  -  -  -  -  -  -  -  -  -  -  -  -  -  -  -  -  -  -  -  -  -  -  -

C even got a hit out of helping me in the kitchen.  Check out his cool creation! Yum!!!


* Please note that Immaculate Baking did provide me with coupons and free product; however all opinions are 100% mine. :)


Wednesday, March 13, 2013

{Healthy} Chocolate Protein Bars

This is my new FAVORITE {healthy} snack. They are just that good! I could eat the whole pan but then again that would probably defeat the point of eating a healthy snack, considering portion control is essential no matter what you are eating....unless it's perhaps raw veggies. Enough with the rambling, let me share the recipe with you!


{Healthy} Chocolate Protein Bars
2 1/2 c. old fashioned oats
1/2 c. wheat germ
1/8 c. flax seed meal
1/2 c. protein powder (I used Arbonne's chocolate protein powder)
1/2 c. dried fruit (I used dried cherries)
1/2 c. raw nuts or seeds (I used slivered almonds)
1/2 c. dark chocolate chips (I may have added a few extra :)
1 c. almond butter
3/4 c. honey
1/3 c. molasses
1 t. vanilla
1/4 t. cinnamon
1/8 t. salt
1 or more cups Rice Krispies

Mix first 6 ingredients together. Melt chocolate chips, almond butter, molasses, and honey over medium-high heat on stove. Take off heat and add vanilla, cinnamon, and salt. Mix with dry ingredients. Mixture will be very wet and sticky. Lastly, add 1 cup or more of Rice Krispies until it's a consistency you like. Press into a pan and then refrigerate until firm. Cut into bars and store in fridge.

I made a double batch which completely filled a 9 x 13 inch pan.

Sunday, May 20, 2012

Frozen Yogurt Dots

Another great idea from Pinterest! FROZEN YOGURT DOTS!!! My kids love eating yogurt and this takes their snack time to a whole new level! They love popping these frozen yogurt dots into their mouth. Very refreshing after playing outside all afternoon on a hot day.


Frozen Yogurt Dots
Source: One Good Thing By Jillee


Put any kind of yogurt into a small zip lock bag (I used Yoplait peach and key lime). Snip a small corner off the zip lock bag and squeeze small dots of yogurt onto a parchment-lined sheet pan.  Freeze for at least one hour and then pop them in your mouth!


Friday, March 30, 2012

Chocolate Granola Bars

My kids and I are big snackers. I like to try to have healthy snacks laying around the kitchen for us to eat and was excited to try this recipe for homemade granola bars. They turned out great and taste great too! They won't last long!


Chocolate Granola Bars
Source: The Marathon Mom

1/2 c. natural peanut butter
1/3 c. local honey
1/4 c. unsalted butter
1 c. oats (not quick oats)
2 T. wheat germ
1/2 c. coconut
1/2 c. chocolate chips (Mini work best, but it doesn’t really matter.)

Melt the butter, peanut butter and honey in a pot over medium to low heat, stirring constantly. Turn off the burner when melted. Pour in the cup of oats and the wheat germ. Stir until combined.
Wait until it cools and stir in the coconut and chocolate chips. Or, if you’re impatient with things like this, like I am, go ahead and dump it all right in. The result will be a more uniform chocolate taste.

Pour into foil-lined 8 X 8 pan and stick in the fridge. Once cooled, flip out onto cutting board and cut to the size you like.

Saturday, February 4, 2012

Granola Energy Balls

For one of my culinary classes, I have to leave the house at 1pm and don't get home until 10:45pm. We don't get a long enough break to actually pack a dinner or large snack and since it's a bread class it takes a long time to mix, proof, and bake the bread before there is anything edible. We usually don't sample our work until around 9pm. Needless to say, I usually get VERY hungry in between that time. I saw these energy balls on Pinterest and made them a couple weeks ago. They taste great and are good for me. They are perfect to pop in my mouth during the few short breaks that we do get. They are the key to keeping my energy level up and stop my stomach from growling all evening.


Granola Energy Balls
Source: The Marathon Mom

2 c. oats
2 c. coconut flakes
1 c. peanut butter
1 c. ground flaxseed
1 c. chocolate chips
2/3 c. honey
2 t. vanilla
1 t. cinnamon (optional)

Mix all ingredients thoroughly. Roll into bite-size balls. Store in fridge.

Tuesday, July 26, 2011

Raspberries with Chocolate Chips

Ever have one of those moments when you wonder, "Why didn't I think of that?!?!?!" Well, this is one of those ideas. This is so simple yet such a great idea! We bought a quart of raspberries at the farmer's market the other day and I turned some of them into these little delights. They are so fun to pop into your mouth. The raspberries were so sweet and the little bites of chocolate made them even better! Give it a try...


Sunday, July 10, 2011

Captain Crunch Peanut Butter Bars

Here's another snack/dessert I made to share at the lake house. These things were addictive and I wanted to eat the whole batch! Needless to say, these did not last long. They were devoured rather quickly!


Monday, July 4, 2011

Stained Glass Jello


Happy 4th of July everyone!

Here's a fun red, white, and blue jello recipe to share with you today. Cut them out in shapes (like stars) or into squares.

I hope everyone has a very blessed Independence Day!


Sunday, March 27, 2011

Honey Graham Crackers

My 11 month old LOVES graham crackers! She will chew on them with her 2 tiny teeth (gum them) until she is covered in a sticky brown coating. A bath is almost always necessary after an afternoon with graham crackers!

The other day a friend's FB status said that she was making her own crackers. It got me to thinking...that sounds like fun! I had never thought about making my own crackers before so I started searching the internet for recipes. There are tons of recipes out there for all kinds of different crackers including graham crackers.

They were surprisingly easy to make! They just take a bit of time to roll and cut. I didn't bake my first batch long enough and they came out a bit soft. I baked the second batch for the entire 15 minutes and they turned out perfect. Nice and crunchy like store-bought graham crackers. Yum!


Monday, March 7, 2011

Fruit Granola Bars

This recipe came from my cousin's wife. For my bridal shower (more than 6 years ago) everyone was to bring a recipe card with one of their favorite recipes written on it. (This is such a great idea if you know of anyone getting married any time soon!) I loved reading through everyone's recipes and trying them out...knowing that they picked this one out just for me.

These granola bars are delicious! I've made them several times usually either with raspberry or blueberry fruit spread. They are great for breakfast, for dessert, or for an afternoon snack.


Wednesday, February 23, 2011

Hummus

We had this along-side the Tabbouleh the other day. I often times buy hummus at the grocery store and have tried many different flavors of it but this was the first time I've ever made it from scratch. It is SUPER easy to make. Just throw everything into your blender or food processor and it's ready!

Garbanzo beans are just another name for chickpeas. A jar of Tahini can be found in the International Food Aisle of Meijer (for example).

This is a great side dish to serve with pita bread and also makes a great mid-day snack. It's healthy and delicious!


Thursday, January 27, 2011

Robot Party

I wanted to share some pictures from my son's 4th birthday party. He wanted a Robot party so I ordered some supplies from The Oriental Trading Company, started saving my empty soup and formula cans, gathered some random nuts, bolts, and hinges, and got creative using my hot glue gun. There are lots of great ideas all over the internet that got my creative juices flowing.

For example, I made this utensil holder out of soup cans, a big formula can, and some colored electrical tape. Isn't he cute? The red and blue plastic forks and spoons are essentially the robot's "hair".


All the food even had a robot theme to it. Here's what we served:

Computer Chips - Potato Chips
Memory Cells - Cheese Puffs
Nuts and Bolts - homemade Chex Mix (recipe below)
Robot Energy - Fruit and Veggie Trays
Battery Cells - M&M's
Machine Oil - Juice Boxes
Fuel Cake - Cupcakes
Robot Pizza - Pizza

Saturday, January 8, 2011

Roasted Chickpeas

While surfing different food blogs this afternoon I became very intrigued by several Roasted Chickpea recipes. They all raved about how it is such a healthy snack and loaded with lots of fiber as well as taste. I even found an article called "15 More Ways to Flavor Roasted Chickpeas". I jumped on the boat and wanted to try some myself. I had two cans of chickpeas that have been in my pantry for about a year and were dying to be used up (I bought them a long time ago wanting to make my own hummus but never got around to it).

I made two different kinds, one sweet and one salty and the recipes are posted below. I definitely favored the salty one and had fun munching on it. They say you really need to eat them up the same day or else they will lose some of their crunch the following day. Have you ever had CornNuts? That's exactly what they remind me of!


Saturday, December 18, 2010

Mixed Up Snowman Snacks

My son's preschool Christmas party was this week and I wanted to take something fun to pass out to his classmates. I found this adorable idea on a blog call Gourmet Mom on-the-Go. It's called Mixed Up Snowman Snacks and it makes the perfect snack for little fingers. It consists of mini marshmallows (snowballs), mini chocolate chips (buttons and eyes), fruit roll up (scarf), pretzel sticks (arms), orange sprinkles (noses), and junior mints candy (hats). The kids are going to love these! Gourmet Mom even provides a link to the labels to print! Super easy and super cute.

*If I were to do this again, I would use either red or green fruit rollups for the scarves. The multi-colored fruit rollup just didn't look as pretty.


Sunday, November 7, 2010

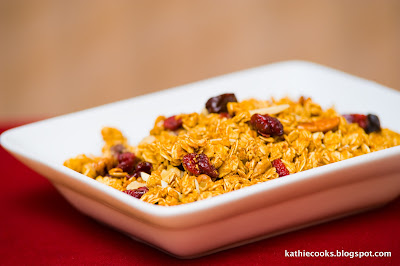
Pumpkin Granola


If you are a fan of granola than you will like this recipe! It made my house smell so good while it was baking and it tasted just as good! I have been snacking on it all day and even had it with some milk for breakfast this morning.

I read some of the comments that were posted on the Two Peas and Their Pod blog regarding this recipe. Some people said it was not as crunchy as they would have liked it to be so I ended up baking it about 5 minutes longer than the directions say. Also, the recipe calls for pepitas which are green raw pumpkin seeds. I've never had a pepita before so I just stuck with almond slivers, walnuts, and pecans. In addition to the dried cranberries, I also added dried cherries and blueberries.

This recipe was delicious!

Pumpkin Granola
Source: www.twopeasandtheirpod.com

5 c. rolled oats
1 t. pumpkin pie spice
1 t. cinnamon
1/4 t. nutmeg
¾ t. salt
¾ c. brown sugar
½ c. pumpkin puree
¼ c. applesauce
¼ c. maple syrup
1 t. vanilla extract
3/4 c. dried cranberries
1/2 c. pepitas ***see note

1. Preheat the oven to 325° F. Line a large baking sheet with parchment paper and set aside.

2. In a large bowl, combine oats, spices, and salt. Mix well.

3. In a medium bowl, whisk together brown sugar, pumpkin puree, applesauce, maple syrup and vanilla extract. Whisk until smooth. Pour wet ingredients into oat mixture and stir until the oats are evenly coated. They will be moist. Evenly spread the mixture onto the prepared baking sheet.

4. Bake for 20 minutes. Remove pan from the oven and stir. Bake for an additional 15-20 minutes or until the granola is golden and crisp. Remove from the oven and stir in dried cranberries and pepitas. Let cool completely. Store in an airtight container.

Note: You can use almonds, walnuts, pecans, or sunflower seeds in place of the pepitas.

Saturday, October 9, 2010

Haystack Creatures


Here's yet another cute, tasty, and easy Halloween recipe. My 3 1/2 year old keeps asking me if he can eat another monster. These things are hilarious. I love them! You can make any size creatures you want.

Look! Here's a family of 5. A papa, mama, and 3 kiddos. They're a good lookin' family aren't they?


Haystack Creatures
Source: Woman's Day

8 oz bittersweet chocolate, finely chopped (I used a partial bag of chocolate chips and a T. of shortening)
1 can (5 oz) thin chow mein noodles
1⁄2 c. vanilla frosting (I used some melted white candy melts)
18 green jelly beans (I used M&M's)
18 small purple sugar ball candies (You can use any color!)

Line a large baking sheet with waxed paper or nonstick foil.

Place chocolate in a microwave-safe bowl and melt on high in microwave 1 to 2 minutes. Stir until smooth. Scrape chocolate into a large bowl; add noodles and gently toss with a rubber spatula until all the noodles are evenly covered in chocolate.

Drop heaping 1⁄4-cupfuls of noodle mixture into 9 haystacks on prepared cookie sheet. Let dry 1 hour at room temperature (or speed it up by refrigerating them 30 minutes until hard).

Put frosting into a small ziptop bag; snip off a tiny corner of the bag and pipe 2 dabs onto each creature and attach 2 jelly bean eyes. Pipe a dot in center of each eye and attach a candy ball in center. Let dry 1⁄2 hour.

Thursday, October 7, 2010

Owl S'mores


Halloween is quickly approaching! I saw these adorable little owls while surfing the internet the other day and fell in love with them! They were super easy to make and my 3 year old loved helping make them. These would be great to make for a school Halloween party and are sure to make people smile.

Oh Look!!! There are even baby owls!!! :) I had so much fun making the big owls that I used miniature marshmallows and mini M&M's to make some babies. There are 8 babies in all. Perhaps I will call them John and Kate plus EIGHT!


Owl S'mores
Source: www.livinglocurto.com

Graham crackers
Marshmallows
Chocolate chips
Yellow candy melts
Candy corn
Mini M&M's and miniature marshmallows (If you want babies too!)

For directions on how to make these adorable owls please visit the original post provided by Living Locurto by clicking HERE.

Wednesday, September 29, 2010

Trix Cereal Treats


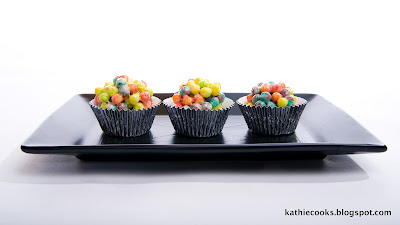
Here's a little twist using the standard Rice Krispie Treat recipe, using Trix cereal instead. (I didn't notice it until I got home from the grocery store but this was a special box of Trix called Fruitalicious Swirls.) These are so fun and colorful. Kids love them and they would be great to make for birthday parties!

I even tried half the recipe with Cocoa Puffs so I could get my chocolate fix for the day.


Trix Cereal Treats
Source: Adapted Rice Krispie Treat recipe


3 T. butter or margarine
1 10 oz. package regular marshmallows OR 4 c. miniature marshmallows
6 cups Trix

In large saucepan melt butter over low heat. Add marshmallows and stir until completely melted. Remove from heat.

Add cereal. Stir until well coated.

Next you'll want to grease your hands with a little butter or spray lightly with Pam. Grab a handful of cereal and gently roll into a ball. (Careful because the cereal mixture is still a little hot.)

Place the cereal balls into cupcake liners and enjoy!