Friday, January 13, 2012

Chocolate Raspberry Layer Cake


My neighbor recently celebrated a birthday. The big 4-0 so I wanted to make a special surprise for him. His wife told me that his favorite dessert was chocolate cake with raspberries so I did a little digging on the internet and this is the recipe I found. It turned out great and I will definitely make it again and again. The chocolate cake was very rich and the fresh raspberries on top were a nice combination. I even tempered a bit of dark chocolate and piped out a 40 to put in the middle. It's always fun to surprise someone on their birthday with some fresh baked goods!


Chocolate Raspberry Layer Cake
Source: Bon Appetit

Cake:
Nonstick vegetable oil spray
2 c. flour
1 3/4 c. sugar
3/4 c. unsweetened cocoa powder
2 t. baking soda
1/4 t. salt
1 c. water
3/4 c. buttermilk
3/4 c. vegetable oil
3 large eggs

Chocolate ganache and raspberry topping:
18 oz. bittersweet chocolate (do not exceed 61% cacao), chopped
2 1/4 c. heavy whipping cream
6 T. seedless raspberry jam, stirred to loosen, divided
2 6-oz. containers fresh raspberries
Powdered sugar

Test-Kitchen Tip:
A two-step process ensures a picture-perfect dessert. First, a thin layer of ganache is spread over the cake and chilled briefly to set (this is called a crumb coat). Another layer of ganache is then poured over the cake, which gives the treat a smooth finish.

Preparation:
Cake
Position racks in top and bottom third of oven; preheat to 350°F. Coat two 9-inch-diameter cake pans with 2-inch-high sides with nonstick spray. Line bottoms with parchment paper rounds; spray rounds. Sift flour, sugar, cocoa powder, baking soda, and salt into large bowl; whisk to blend and form well in center. Whisk 1 cup water, buttermilk, oil, and eggs in medium bowl to blend. Pour wet ingredients into well in dry ingredients; whisk just to blend. Divide cake batter between prepared pans (about 3 cups each).

Bake cakes until tester inserted into center comes out clean, about 30 minutes. (If cakes form domes, place kitchen towel atop hot cakes, then press gently with palm of hand to level.) Cool completely in pans on cooling racks. DO AHEAD Can be made 1 day ahead. Cover cakes in pans and let stand at room temperature.


Chocolate ganache and raspberry topping
Place chopped chocolate in medium bowl. Bring cream just to boil in heavy medium saucepan. Pour over chocolate. Let stand 1 minute, then stir until ganache is melted and smooth. Transfer 1 1/4 cups ganache to small bowl. Cover and refrigerate until ganache is thick enough to spread, stirring occasionally, about 1 hour. Let remaining ganache stand at room temperature to cool until barely lukewarm.

Place rack inside rimmed baking sheet. Carefully run knife around pan edges to release cakes. Invert 1 cake layer onto cardboard round or bottom of 9-inch-diameter tart pan with removable bottom. Peel off parchment paper. Place cake layer on round on prepared rack. Spread 3 tablespoons jam over top. Spoon dollops of chilled ganache over, then spread evenly. Invert second cake layer onto another cardboard round or tart pan bottom. Peel off parchment paper. Carefully slide cake off round and onto frosted cake layer on rack. Spread remaining 3 tablespoons raspberry jam over top of second cake layer. Pour half of barely lukewarm ganache over cake, spreading over sides to cover. Freeze until ganache sets, about 30 minutes. Pour remaining ganache over cake, allowing to drip down sides and spreading over sides if needed for even coverage and to smooth edges. Freeze to set ganache, about 30 minutes. DO AHEAD Can be made 2 days ahead. Cover with cake dome and refrigerate. Let stand at room temperature 2 hours before continuing.

Arrange raspberries in concentric circles atop cake. Sift powdered sugar lightly over raspberries and serve.

Wednesday, January 11, 2012

Rotisserie Chicken


Here's another recipe from Pinterest. Busy Mom shows us how to make our own Rotisserie Chickens in the crock pot. It turned out so juicy and tender; a bit hit with my family. My only complaint is that once you add water to the seasonings to form a paste it can be rather hard to spread over the raw chicken without leaving big clumps behind. Next time I am going to try making the rub with less water or maybe even no water (a dry rub). Nonetheless, it was a great recipe and I used our leftover chicken for fried rice the next day.


How To Make Your Own Rotisserie Chicken
Source: Busy Mom

1 broiler/fryer chicken (3.5-4 lbs)
2 T. Paprika
1/2 t. cayenne pepper (optional!)
1 1/2 t. onion powder
2 T. garlic powder or 3 cloves garlic
1 t. salt
1/2 t. black pepper

Place all of your ingredients in a small bowl and stir in water by the teaspoon until a paste forms. Spray your slow cooker with cooking spray and place the chicken in, breast side up. Coat the chicken inside and out with the paste. Cover and cook on low 6-7 hours or on high 3.5-4.5 hours. Make sure the thickest part of the thigh registers at 180 degrees.

Monday, January 9, 2012

Exciting News!

I know it's not really the time of year to be thinking about candy corn but I have some exciting news to share! I recently submitted an Instructable with step-by-step pictures and directions on how to make candy corn cookies and today they informed me that they loved it. They loved it so much that they are featuring it on their Home Page! Check it out by clicking HERE or going to www.instructables.com and scrolling down to the "Food" section.

Here are some of the pictures from my instructable:

Sunday, January 8, 2012

Doughnuts

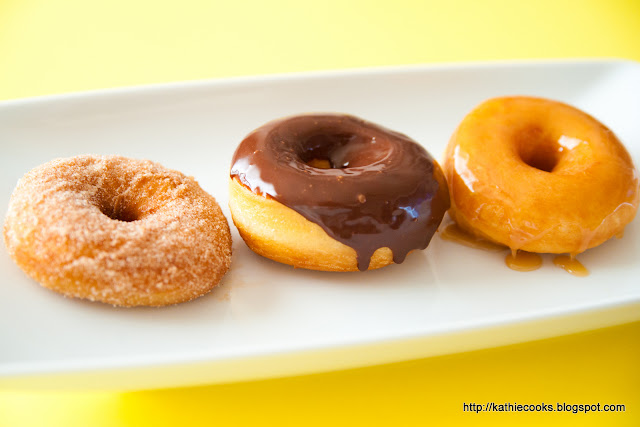
Doughnuts are a huge weakness of mine! I would eat them every morning if I could but then I wouldn't be able to fit into my clothes! Having company over is always a good excuse to make doughnuts for breakfast so that's exactly what I did. I set the alarm early so I could make the dough and then went back to bed and snoozed for another hour and a half while the dough did it's initial rise.

You can shake these in cinnamon and sugar, dip into a chocolate ganache, or dip in caramel sauce. I couldn't decide which one I wanted...so I ate one of each!!! Yikes!


Doughnuts
Yield: Makes 20 doughnuts, 2 1/2 oz. each

4 oz. Granulated sugar
0.5 oz. Salt
1 lb. 12 oz. Bread flour
1.5 oz. Dry milk powder
0.02 oz. Cinnamon (1/4 t.)
3 oz. Shortening
5 oz. Eggs (3 eggs)
3 fl. oz. Buttermilk
0.5 fl. oz. Vanilla extract
0.5 oz. Instant Yeast
8 oz. Warm water (100 degrees F.)

1. Combine the sugar, salt, flour, milk powder, cinnamon, and shortening in the bowl of a mixer fitted with a dough hook. Mix briefly to blend the spices throughout the dry mixture. Beat the eggs lightly and then add them to the flour mixture along with the buttermilk and vanilla.

2. Dissolve the yeast in the water and add to the flour. Mix on low speed about 2 to 3 minutes, adding additional flour if needed to make a soft dough. Scrape down the bowl and increase speed to medium. Knead the dough 5 to 7 minutes until it is smooth, soft and elastic.

3. Ferment the dough until doubled, approximately 1 1/2 to 2 hours.

4. Roll the dough out into a rectangle 1/2 inch thick. Cut out individual pieces with a doughnut cutter and place them on lightly floured sheet pans.

5. Portion the remaining dough, then cover and proof until it has increased 75 percent in volume.

6. Fry the doughnuts in batches in deep fat heated to 385 degrees F. Cook until puffed and browned, approximately 1 or 2 minutes. Flip the doughnuts using a long wooden skewer and cook another minute until browned. Remove from the fat and drain on absorbant paper.

7. Toss in sugar and cinnamon or cool slightly before dipping into caramel or chocolate glaze.

Friday, January 6, 2012

More Fruit Tarts


I want to share some mouth-watering, colorful pictures with you today! Here are some fruit tarts that I made for our Christmas Eve dinner. I had a lot of fun with them and tried to make each and every one of them look unique. There were big fruit tarts for the adults and mini fruit tarts for the kiddos. They were a huge hit and tasted just as good as they looked.


Sweet Dough
*You may want to cut this recipe in half.*

1 lb. Butter
1 lb. Sugar
5 Eggs
.25 oz. Salt
.125 oz. Baking Powder
2 lb. Cake Flour
Pinch of Orange Zest
Pinch of Lemon Zest

1. Cream butter, sugar, and zest until smooth.
2. Add eggs gradually, scraping bowl 2-3 times.
3. Sift flour with baking powder and salt. Add dry ingredients until just combined. Do not overmix!
4. Refrigerate 1 hour before using.
5. Roll out and line mini tart pans, dock, and blind bake at 350 degrees for 10-12 minutes until light golden brown.
6. Remove from tart pans and allow to cool.


Pastry Cream
16 oz. Milk
2 oz. Sugar
- - - - - -
2 Egg Yolks
1 Whole Egg
2 oz. Sugar
4 T. Cornstarch
- - - - - -
1 t. Vanilla Extract
1 oz. Butter

1. Bring milk and first quantity of sugar to boil.
2. Meanwhile combine yolks, egg, cornstarch, and remaining sugar.
3. Temper hot milk into eggs and return to pot.
4. Bring to boil whisking constantly over medium heat.
5. Remove from heat and stir in butter and vanilla.
6. Cool over ice water bath with plastic wrap directly on surface to prevent a skin from forming.


Fill fruit tart shells with pastry cream and then decorate with lots of fresh fruit, making sure to cover all of the pastry cream. In a small saucepan, heat up some apricot jam with a couple teaspoons of water until you get a thin glaze. Lightly brush apricot glaze on top of the fruit. This is what makes it shiny and really adds to the presentation.

Wednesday, January 4, 2012

Hubby's Birthday "Cake"

Hubby's birthday was in the midst of all of the holiday craziness but I surprised him with a "cake" made out of his absolute favorite dessert - profiteroles (aka cream puffs)!


Click HERE to view my previous post on how to make pâte à choux and pipe them into profiteroles. Allow to cool to room temperature.

Make pastry cream and chill. Click HERE for previous post with a pastry cream recipe.

Slice the profiteroles in half. Slice strawberries and place 2 slices on bottom pieces of profiteroles. Pipe some pastry cream on top of the strawberries and then replace top of profiterole.

Arrange filled profiteroles on a plate and dust with powdered sugar.

Light candles and sing Happy Birthday! :)

Monday, January 2, 2012

Fried Swai Fish with Dipping Sauce


Here's another one of my favorite Chinese recipes. I'm so excited to share it with you. It's another recipe that my sweet father-in-law taught me himself. I begged him to teach me several things before they went back to China. He used to own his own Chinese restaurant in the northern burbs of Chicago so he has many, many amazing recipes that he can just make by heart. He offered to teach me anything I wanted and this was sure to be one of them. I can't wait until their next visit so I can learn even more from him.

I love this fish because it's not fishy at all. It's so tender and frying it up makes it even that much better. Everyone (even my kids) devour this meal every time I make it!


Fried Swai Fish w/Dipping Sauce
Source: my wonderful father-in-law

2 frozen swai (or sole) fish fillets
1/2 t. salt
1 t. sugar
1 egg
1 1/2 T. cornstarch
1 1/2 T. flour
- - - - - - - - - -
1/8 c. ketchup
1 ½ t. chinkiang vinegar
2 t. sugar
1 ½ t. soy sauce
little squirt of hot sauce
¼ t. sesame oil

Cut 2 frozen swai fish fillets in half (length wise); then cut each half in 4 pieces cutting at an angle.

Put fish pieces in small mixing bowl and add ½ t. salt, 1 t. sugar, 1 egg, 1 ½ T. cornstarch, and 1 ½ T. flour. Stirring after each addition.

In large frying pan heat oil on high heat. Fry fish on med-hi heat for approx. 3-4 minutes on each side or until golden on both sides. Remove from oil.

To make the sauce:
Add 1/8 c. ketchup, 1 ½ t. chinkiang vinegar, 2 t. sugar, 1 ½ t. soy sauce, little squirt of hot sauce, and ¼ t. sesame oil to a small sauce pan. Heat up over med-high heat. Stir while warming up the sauce and don’t cook it too long or the sugar will burn.

If the sauce is too thick, you can add a little water to thin it out.