Thursday, May 31, 2012
Another Kit Kat and M&M Cake
Remember my red, pink, and white Kit Kat / M&M cake last February? Click here to see the post. Well...I am still in love with these cakes and have made several more since then. Just recently I had a request for one with blue, teal, and green M&M's.
What a unique and fun way to surprise someone on their birthday!
Tuesday, May 29, 2012
My First CSA Experience
I purchased a CSA this spring and today we got to taste the first box of harvest! Not familiar with CSA's? CSA stands for Community Supported Agriculture. A CSA is a type of membership that enables us to personally know the farmers and farms that produce the food. It is a direct purchasing relationship between the local farmer and the community members. It is like a "subscription" for fresh vegetables. Members agree to purchase a season's worth of produce or "share" before the harvest season begins. In turn, the members receive a weekly box of ultra-fresh harvest during the local growing season (June - October).
Here's what came in today's box: Snap peas, shelling peas, radishes, spring raab (similar to broccoli), bok choi, gourmet lettuce mix, and onions!
This not only guarantees that I will eat more veggies this summer but it's also a great way to try new ones that I wouldn't normally buy in the grocery store. I LOVE vegetables so I can't wait to see what comes in my box during the upcoming weeks!
For more information on this CSA, visit Zilke Vegetable Farm.
Monday, May 28, 2012
Happy Memorial Day!
Wednesday, May 23, 2012
Cheeseburger Casserole
We had cheeseburgers this week...in casserole form! My 5 year old was super excited when I told him there were pickles, and ketchup, and mustard inside...everything he likes on his standard cheeseburger! This meal turned out delish! Super duper easy to make and everyone gobbled it up!
Cheeseburger Casserole
Source: Hanging On By A Thread
1 lb. lean ground beef
1/4 c. chopped onion
1/4 c. chopped dill pickles
1/2 c. water
1/2 c. ketchup
1 T. yellow mustard
1/8 t. pepper
1 1/2 c. shredded American Cheese (6oz)
1 can (8oz) Pillsbury Crescent Recipe Creations refrigerated seamless dough sheet
1 egg, beaten
1 T. sesame seeds
Heat oven to 350 degrees, in a 10-inch nonstick skillet cook beef and onion over medium-high heat 5-7 minutes, stirring frequently, until thoroughly cooked; drain. Stir in pickles, water, ketchup, mustard and pepper.
Spoon beef mixture into 11 x 7 inch (2 quart) glass baking dish, sprinkle with cheese.
Unroll dough; press into 12 x 8 inch rectangle. Cut into 6 squares; place on top of cheese. Brush with egg; sprinkle with sesame seeds.
Bake 25-30 minutes or until deep golden brown.
Sunday, May 20, 2012
Frozen Yogurt Dots
Another great idea from Pinterest! FROZEN YOGURT DOTS!!! My kids love eating yogurt and this takes their snack time to a whole new level! They love popping these frozen yogurt dots into their mouth. Very refreshing after playing outside all afternoon on a hot day.
Frozen Yogurt Dots
Frozen Yogurt Dots
Source: One Good Thing By Jillee
Put any kind of yogurt into a small zip lock bag (I used Yoplait peach and key lime). Snip a small corner off the zip lock bag and squeeze small dots of yogurt onto a parchment-lined sheet pan. Freeze for at least one hour and then pop them in your mouth!
Tuesday, May 15, 2012
Chicken and Noodle Soup
Super easy chicken noodle soup for the crock pot thanks to Pinterest! I made this last week and it was just a coincidence that my neighbor's boy was sick so I shared some with him too. This soup received a thumbs up from all!
Chicken and Noodle Soup
Source: Creatively Domestic
5 c. chicken broth
10.75 oz can cream of chicken soup
1/2 c. onions, chopped fine
1/2 c. celery, chopped fine
1/2 c. carrots, chopped fine
1/2 c. green onions, sliced
15 oz can of whole kernel corn, drained
Salt and Pepper to taste
1 1/2 c. Egg noodles
2 c. cooked chicken, chopped
Add everything but the noodles and cooked chicken to the crock pot on Low for 5-6 hours, the last hour turn on High, and add noodles and chicken.
Saturday, May 12, 2012
My First Wedding Cake Order
What a fun weekend is has been already! Remember the wedding consultation I blogged about several weeks ago? Well, the wedding was today and I {along with my co-worker} got to deliver and set up all their wedding cakes!
Ready to see the cakes? There were 12 cakes total....9 individual cakes and one 3-tiered bridal cake. EACH cake had a different flavor and filling and was decorated differently. It can't get any more fun than that! They used the individual cakes as the centerpiece for half the tables and flower arrangements for the other half.
Here are all the cakes in no particular order.
Bridal Cake: Cherry Chip, Pina Colada, and Cinnamon Bun Cakes
Michigan State Cake: Once they cut into this cake they will discover a green mint cake with buttercream filling along with wording of the fight song on the outside
Carrot Cake with Cream Cheese filling
Fancy Chocolate Ribbon Cake filled with Oreos and fudge!
Chocolate Cake with German Chocolate Filling
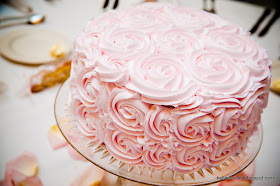
Rose Cake: Lemon Cake with Lemon Filling
Banana Cake with Whipped Filling
Notre Dame Cake: Lemon Poppyseed Cake with Blueberry Filling
Breast Cancer Survivor Cake for Bride's family table
Breast Cancer Survivor Cake for Groom's family table
It feels great having a wedding under my belt now. I was really nervous during the 35 minute drive to deliver the cakes but it was such a great feeling after everything was delivered and set up. I hope the beautiful bride and groom had as much fun eating the cakes as I did making them!
And a special thanks to my amazing hubby for taking these fabulous pictures! :)
Monday, May 7, 2012
Skillet Cajun Spiced Flounder
I'm not a big seafood eater but I do love fish....well, at least the ones that don't have a super "fishy" taste. I need to cook fish more often. This dish turned out really good and was great served on rice. It came from a website called Skinny Taste. Gina has some amazing recipes on her blog and she always includes all the nutritional information and even Weight Watcher points. It's a great place to search if you're in need of some healthy recipes.
Skillet Cajun Spiced Flounder
Source: Skinny Taste
1 t. olive oil
4 (6 oz) pieces flounder fillets (or any white fish such as tilapia)
3/4 c. onion, chopped
2 cloves garlic, minced
3/4 c. diced green bell pepper
2 1/2 c. tomatoes, chopped
1 T. Cajun spice seasoning
In a deep skillet, cook onion and garlic in olive oil on medium heat for a few minutes until soft. Add tomatoes, peppers and spices, stir and cook until tomatoes are soft, about 2-3 minutes.
Lay fish fillets in the sauce, cover and cook on medium-low until fish flakes easily, approx 12-15. To serve, place fish on plate and spoon sauce on top. Serve immediately.
Friday, May 4, 2012
Cheese Tortellini Pesto Pasta Salad
I love pasta salad on hot spring/summer days. I especially love pasta salads made with cheese filled tortellini! This recipe made a TON!!! Oh, and did I mention, it was fabulous?
Cheese Tortellini Pesto Pasta Salad
Source: Food.com
1 (14 oz.) can artichoke hearts, drained, quartered
1 (10 oz.) container grape tomatoes, halved lengthwise
1 (6 oz.) can medium black olives, drained, sliced in half lengthwise
1 green bell pepper, diced
1 (20 oz.) package cheese-filled tortellini, cooked al dente, drained
1/3 c. olive oil, more if needed
1/4 c. parmesan cheese
1 (8 oz.) jar basil pesto
1/2 t. salt, more if needed
2 t. minced garlic
12 oz. mozzarella cheese, cubed
8 oz. rotini pasta, cooked al dente, drained
Cook pastas, set aside to drain and cool a bit. In large bowl, add rest of ingredients, folding gently until well mixed. Gently fold in pastas well. Adjust seasoning to taste, meaning, add more salt, parmesan, etc. until you like it. Serve immediately or refrigerate. If you make this a day ahead of time, you'll need to "refresh" it. Just add a bit more olive oil, salt, and parmesan before serving.
Wednesday, May 2, 2012
Grape Cow
Well, I've heard of a root beer float, a black cow (ice cream float with Coke), and even an orange cow (ice cream float with orange soda) but I've never heard of a Grape Cow before!!! Last summer my uncle was telling me how good it is to blend together grape juice (the purple kind) and ice cream in a blender to make a grape milkshake. Sounded kind of weird to me so we tried it last weekend while my sister and brother-in-law were in town. The verdict? Pretty darn good! The first attempt I put a little too much grape juice in and it just tasted like a creamy grape juice. The second attempt was perfect with more of a milkshake consistency. My 5 year old keeps asking if I'll make more.
Purple grape juice
Vanilla ice cream
Blend together in blender, add straw, and ENJOY!
Purple grape juice
Vanilla ice cream
Blend together in blender, add straw, and ENJOY!